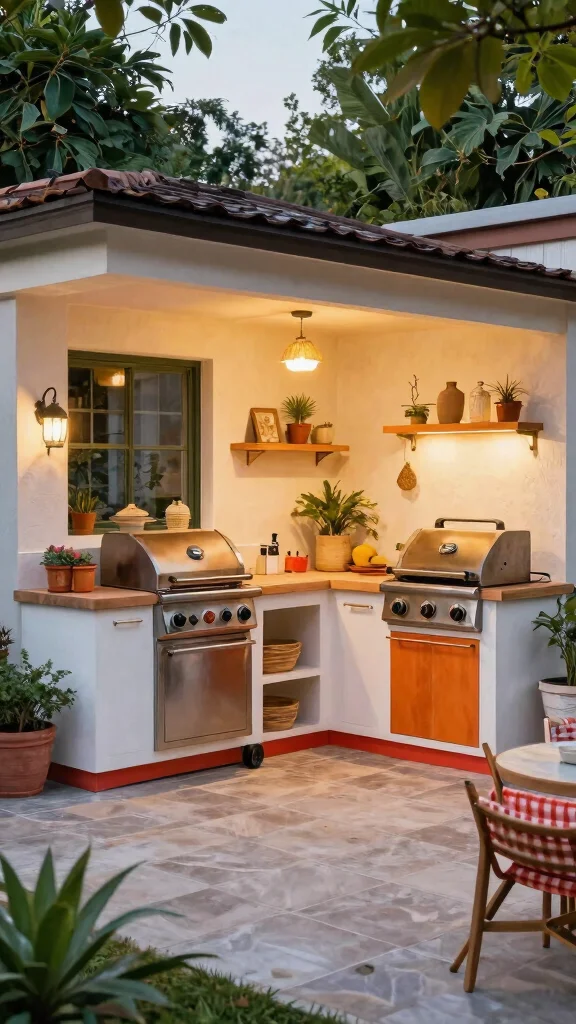
Creating an outdoor kitchen can feel like a pipe dream, especially if you’re trying to stick to a budget. With the warm sun shining and the promise of summer gatherings, the urge to create a stylish cooking space grows stronger. The good news is you don’t need a hefty wallet to enjoy outdoor cooking. This post is designed to help you discover budget-friendly outdoor kitchen ideas that look high-end without breaking the bank.
If you’re someone who loves entertaining, cooking outdoors, or simply enjoying your garden space, you’ll find these ideas especially appealing. Whether you’re a DIY enthusiast or just looking for inspiration, these designs will help you create the stylish backyard kitchen of your dreams—even in small spaces. You’ll get a range of practical tips and creative solutions that will elevate your outdoor space and make it functional and beautiful.
From clever repurposed materials to innovative designs, I’ve compiled 12 ideas that are affordable, chic, and perfect for your backyard. These suggestions will help you create an outdoor kitchen on a budget while enhancing your garden aesthetics. Get ready to roll up your sleeves and transform your patio into a culinary oasis!
Key Takeaways
– Discover how to create a stunning outdoor kitchen using repurposed materials, ensuring style without spending a fortune.
– Learn about inexpensive patio designs that maximize functionality and comfort for your outdoor cooking environment.
– Find out how to incorporate elements like vertical gardening walls and colorful outdoor rugs to add personality to your space.
– Explore creative uses of upcycled furniture and reclaimed wood to develop a unique cooking area that reflects your style.
– Get tips on enhancing ambiance with outdoor lighting and flexible furniture arrangements to adapt your kitchen for all occasions.
1. Repurposed Pallet Grill Station
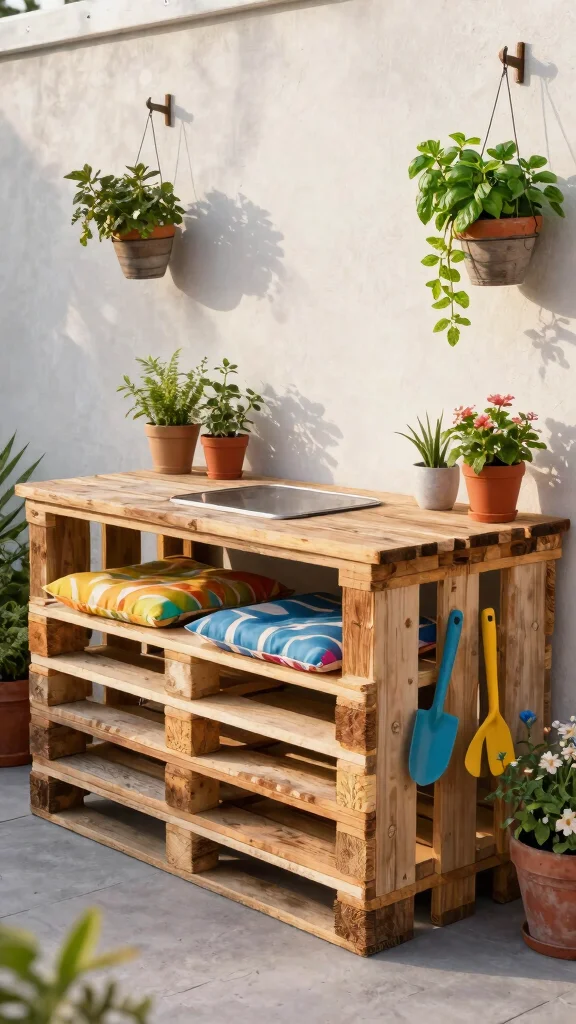
Have you ever thought about transforming old pallets into something extraordinary? A repurposed pallet grill station can add a rustic charm to your outdoor kitchen without costing a fortune. It’s a fun project that not only looks good but also serves as a practical cooking space. You can stack pallets for the base and top it off with reclaimed wood or concrete. Paint it a vibrant color or leave it natural to match your style.
Ingredients:
– Clean, sturdy wooden pallets
– Reclaimed wood or concrete board for the top
– Nails or screws for securing
– Wheels for mobility
– Outdoor cushions and hanging planters (optional)
Instructions:
1. Gather clean pallets and ensure they are chemical-free.
2. Secure the pallets together using nails or screws for stability.
3. Attach wheels to the base for easy movement.
4. Add colorful cushions and hang planters with herbs for a lively touch.
FAQs:
– Can I use any type of pallet? Yes, just ensure they’re sturdy and free from chemicals.
– Can I customize the size? Absolutely! You can adjust the dimensions based on your space.
Cost Breakdown & Budget Planning
Planning your outdoor kitchen on a budget can be exciting and practical. It allows you to create a stylish backyard kitchen that doesn’t break the bank. Here’s a detailed budget guide to help you manage your spending effectively.
Cost Breakdown by Category:
– Materials/Products: Expect to spend between $300 to $2,000, depending on your choices. Basic options like a grill and counter space can be on the lower end, while stone countertops and high-quality grills can push the price up.
– Tools/Equipment: If you need tools, budget around $50 to $200. Simple hand tools and basic power tools will suffice for DIY projects.
– Labor/Professional installation: Hiring professionals can range from $500 to $3,000. If you decide to DIY, you can save this cost but be prepared for some work.
– Optional extras: Extras like lighting, decorative elements, and outdoor furniture can add an additional $100 to $1,000. These enhancements can really elevate the ambiance of your outdoor space.
Budget Tier Breakdown:
Basic Economy Tier $
– What’s included: This tier includes a simple grill, basic prep areas, and maybe a small table.
– Good for: If you’re just starting out and want a place to cook outdoors without frills, this tier is perfect.
– Limitations: You may miss out on more advanced features like built-in appliances or trendy designs that make other outdoor kitchens pop.
Mid-Range Tier $$
– What’s included: This balanced option features a decent-sized grill, counter space, and possibly a small refrigerator.
– Good for: Ideal for families who often entertain and want a functional yet stylish cooking area.
– Best value for: Most people will find this tier offers a great mix of price and features. It allows for more creativity without overspending.
Premium Tier $$$
– What’s included: In this tier, you’ll get high-quality materials, built-in appliances, and custom designs that elevate your space.
– Good for: If you host gatherings frequently or want a luxurious space, this is for you.
– Worth it if: You have the budget and plan to use the kitchen often. This investment can also increase your property’s value.
Money-Saving Tips:
– Consider second-hand materials: Look for used appliances or reclaimed wood. This can cut costs significantly while adding character.
– DIY when possible: Take on simple tasks yourself, like painting or assembling furniture. This can save you labor costs.
– Shop during off-seasons: Buying outdoor furniture and appliances in the off-season can lead to great discounts.
– Think small: Focus on essential elements first. A simple grill and prep table can still create a cozy outdoor cooking atmosphere.
Where to Splurge:
– Quality appliances: Investing in a higher-quality grill or stove can pay off in durability and performance.
– Countertops: A beautiful countertop can make your outdoor kitchen feel high-end. Choose durable materials that withstand outdoor elements.
– Lighting: Good outdoor lighting not only enhances aesthetics but also improves functionality during evening gatherings. Spending here can create a warm and inviting space.
With this detailed budget guide, you’re equipped to create an affordable outdoor kitchen that suits your style and needs. Remember, planning and prioritizing your spending will go a long way in achieving that high-end look without the hefty price tag. Happy building!
2. Stone Fire Pit Kitchen
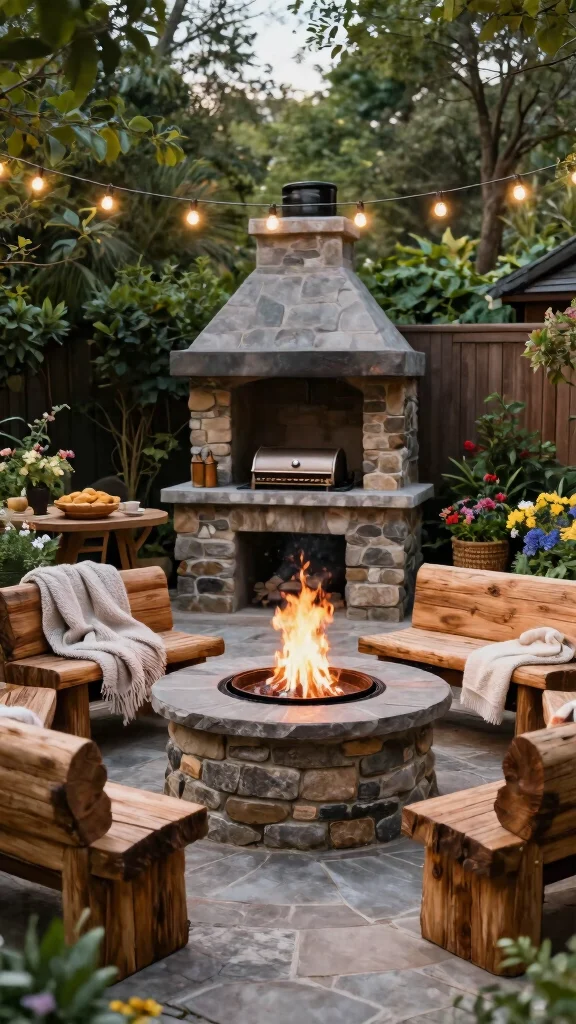
Imagine gathering around a warm fire pit while cooking delicious meals! A DIY stone fire pit kitchen creates a cozy cooking area and a perfect spot for family and friends to gather. You can easily build a simple fire pit using stones or pavers, adding a grill grate on top for versatile cooking. The fire’s glow enhances the atmosphere, making it ideal for evenings outside.
Ingredients:
– Stones or pavers for the fire pit
– Mortar or soil for securing
– Stainless-steel grill grate
– Seating options like benches or logs
Instructions:
1. Choose a safe location away from flammable structures.
2. Level the ground and arrange stones in a circle.
3. Use mortar or soil to secure the stones.
4. Place a stainless-steel grill grate on top for cooking.
5. Surround the fire pit with benches or logs for seating.
FAQs:
– Can I use bricks instead of stones? Yes, bricks work well for building a fire pit.
– Can I cook over the fire? Yes, the grill grate allows for grilling meats and veggies.
3. Compact Barbecue Cart
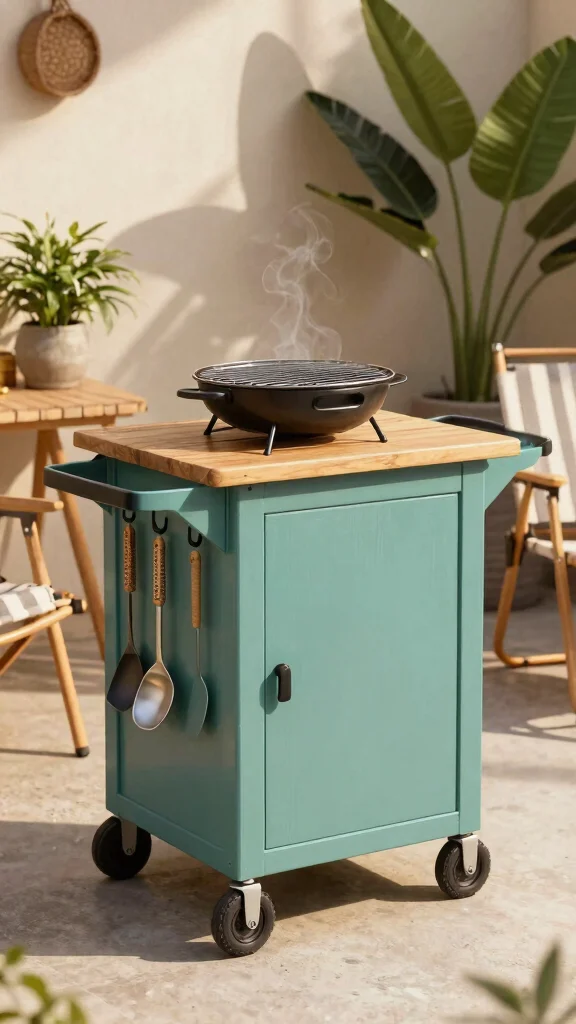
Is your outdoor space limited? A compact barbecue cart could be your ideal solution! These carts are stylish, portable, and can be customized to your needs. You can repurpose an old cart or table, adding wheels and a grill for effortless cooking. It’s a chic way to enjoy barbecue wherever you want!
Ingredients:
– Sturdy cart or wheeled table
– Portable grill
– Hooks for utensils
– Paint or stain for finishing
Instructions:
1. Start with a sturdy cart or table that rolls easily.
2. Securely attach a portable grill on top.
3. Add hooks on the side for organizing tools.
4. Paint or stain the cart to fit your outdoor decor.
FAQs:
– Can I use a regular kitchen cart? Yes, just ensure it’s sturdy enough for grilling.
– Is it easy to move? Yes, wheels make it easy to relocate as needed.
4. Stylish Pergola with Cooking Station
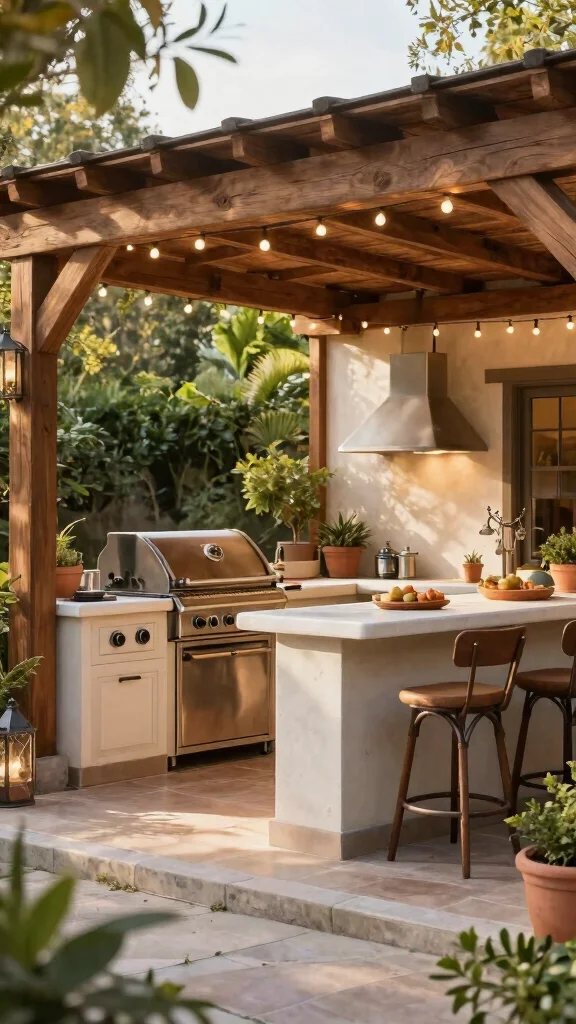
Want to elevate your outdoor cooking experience? A stylish pergola can create a beautiful space for cooking and dining. By adding a cooking station under the pergola, you gain shade and style in your backyard. Building a simple wooden pergola is straightforward and rewarding.
Ingredients:
– Pressure-treated wood or cedar
– Tools for construction
– Outdoor string lights (optional)
Instructions:
1. Decide on the size based on your cooking area and seating needs.
2. Use durable wood for building the frame.
3. Anchor the pergola securely to the ground.
4. Hang string lights for a charming evening glow.
FAQs:
– Can I use different materials for the pergola? Yes, you can use metal or other materials that suit your style.
– How do I maintain it? Regularly check for wear and treat the wood as needed.
An outdoor kitchen on a budget proves big style can come from a simple pergola and a DIY cooking station. Plan smart, use pressure-treated wood, string lights, and a compact layout, shade and flavor without draining your wallet.
5. DIY Island with Reclaimed Wood
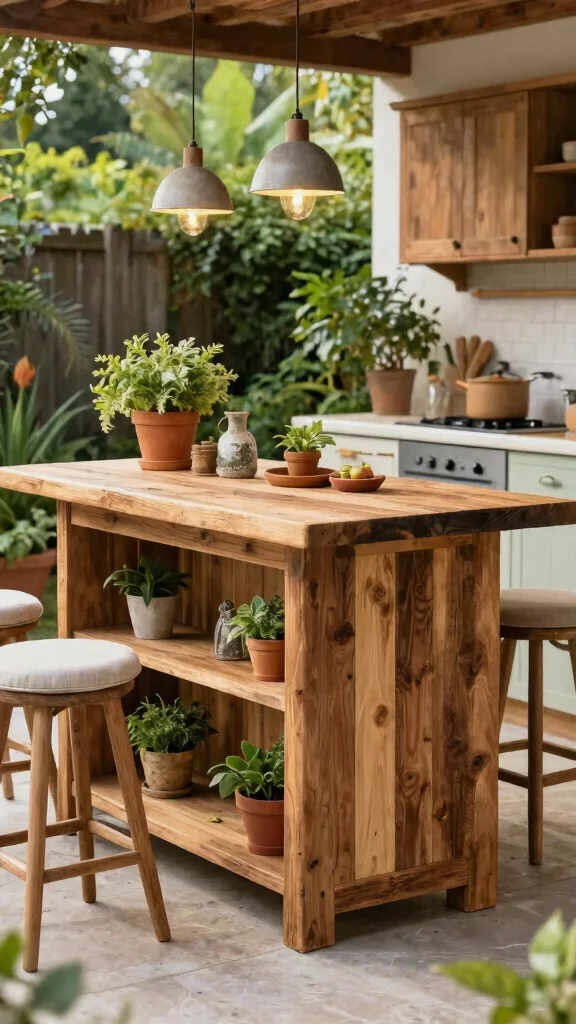
Thinking about a kitchen island in your outdoor space? A DIY island made from reclaimed wood can add charm and functionality without a hefty price tag. This project can be crafted from materials you likely already have, providing extra counter space that doubles as a bar or serving area.
Ingredients:
– Old wood pallets or reclaimed wood
– Sturdy countertop material
– Shelving or cabinetry (optional)
Instructions:
1. Gather old wood and check local sources for affordable options.
2. Build a basic frame with sturdy supports.
3. Add a solid countertop made from wood or composite materials.
4. Include shelves or cabinets for storage.
FAQs:
– Can I use new wood instead? Yes, new wood works well too, but reclaimed adds character.
– What about outdoor weather? Treat the wood to withstand outdoor conditions.
6. Upcycled Furniture as Cooking Areas
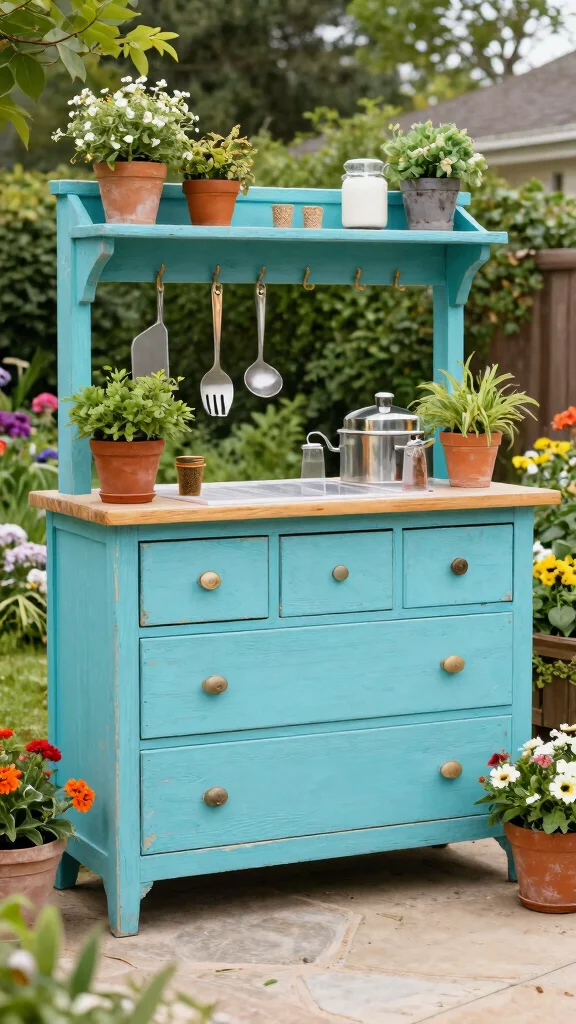
Why buy new when you can upcycle? Old furniture like dressers or tables can be transformed into functional cooking areas for your outdoor kitchen. This approach not only saves money but also gives your space a unique character. For example, an old dresser can become a stylish outdoor prep area!
Ingredients:
– Old furniture (dressers, tables, cabinets)
– Sandpaper and paint
– Hooks for utensils
Instructions:
1. Sand down and paint the furniture to weatherproof it.
2. Use an old tabletop as a grilling surface or a cabinet for storage.
3. Add hooks for utensils and keep the work surface clear.
4. Accessorize with outdoor decor for charm.
FAQs:
– Can I use any furniture? Yes, any sturdy piece can work with some creativity.
– How do I protect it from the weather? Use outdoor paint and sealants to extend its life.
Did you know upcycling a dresser can become a prep station for your outdoor kitchen on a budget, often saving 200–400 dollars compared to new? A little sanding, paint, and smart hooks turn old furniture into stylish, functional cooking space—no new furniture needed.
7. Colorful Outdoor Rug for Style
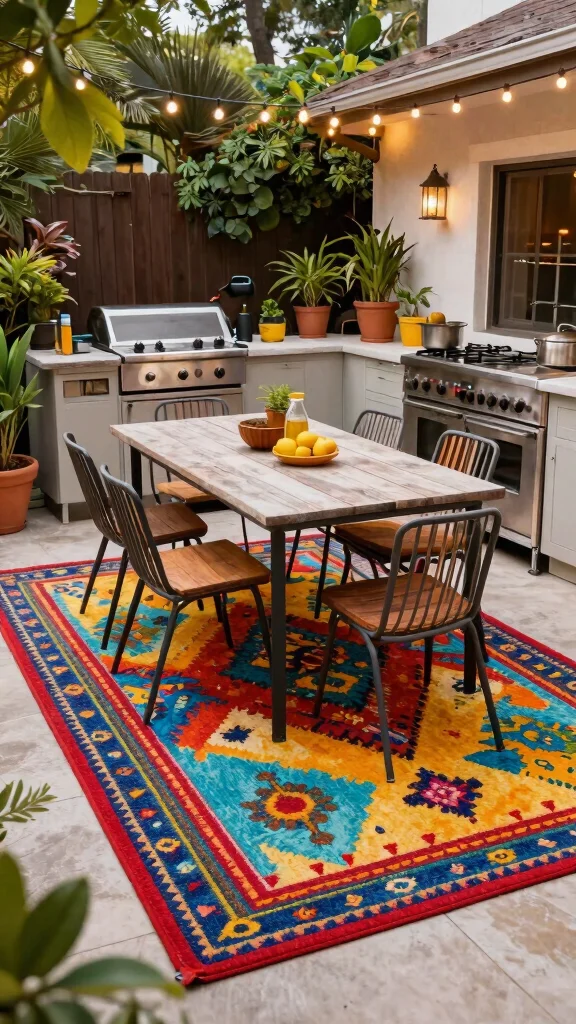
Looking to spruce up your outdoor kitchen? A colorful outdoor rug can add vibrancy and comfort to your space. Not only does it enhance the aesthetic, but it also helps define your cooking area. Choose a weather-resistant rug that complements your decor.
Ingredients:
– Colorful outdoor rug
– Durable materials for outdoor use
– Outdoor cushions for seating
Instructions:
1. Select a rug with bright colors or patterns to match your theme.
2. Ensure it’s made of materials designed to withstand the elements.
3. Place it beneath your dining table or cooking area for a cozy vibe.
4. Add cushions and seating for extra comfort.
FAQs:
– Can I wash it? Yes, most outdoor rugs can be cleaned easily with soap and water.
– Will it fade in the sun? Choose a UV-resistant rug to maintain its color.
8. Vertical Gardening Wall
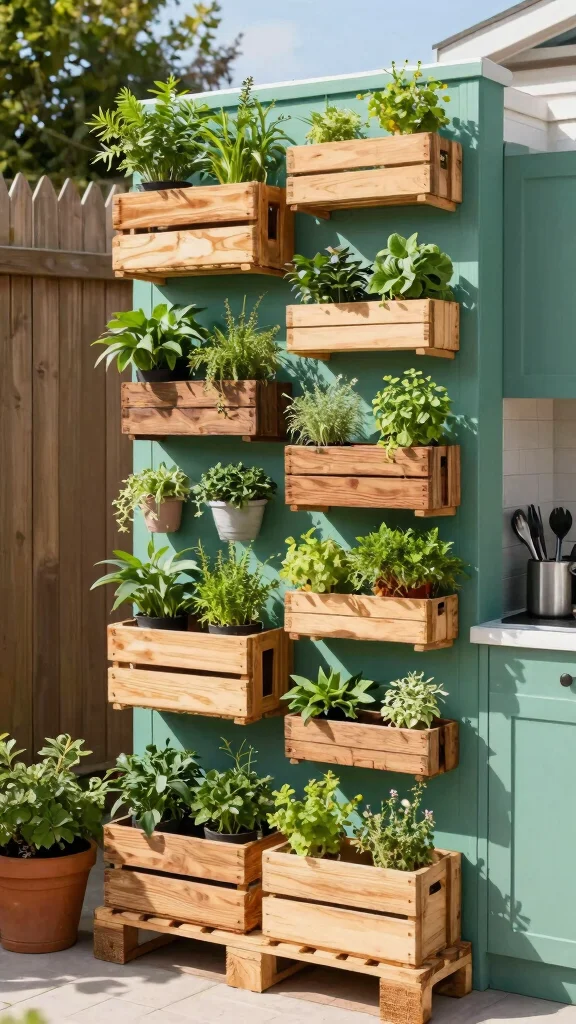
Want to maximize your outdoor kitchen’s potential? A vertical gardening wall is perfect for growing herbs and small vegetables while saving space. It serves as both a functional garden and a decorative feature. You can create one easily with pallets or hanging planters.
Ingredients:
– Wall space or fence
– Pallets, crates, or hanging planters
– Soil and seeds for herbs
Instructions:
1. Choose a sunny wall space in your outdoor kitchen.
2. Use pallets or crates to create vertical tiers for planting.
3. Plant herbs like rosemary and thyme for easy access.
4. Consider a small drip irrigation system for convenience.
FAQs:
– Can I use a regular planter? Yes, any planter that suits your space will work.
– How do I maintain it? Regular watering and trimming will keep your herbs thriving.
9. Outdoor Lighting for Ambiance
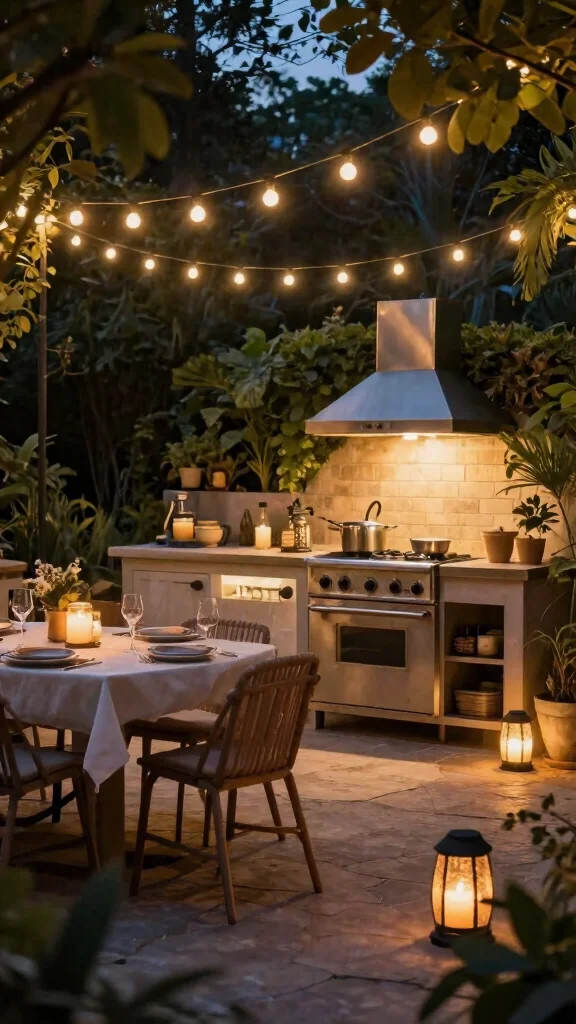
Have you thought about how lighting can transform your outdoor cooking experience? The right outdoor lighting can create a magical atmosphere, making evening gatherings even more special. From string lights to lanterns, there are endless options to illuminate your space.
Ingredients:
– String lights or outdoor lanterns
– Motion-sensor lights (optional)
– Additional decor lights
Instructions:
1. Hang string lights overhead for a festive touch.
2. Place solar lanterns or candles on tables for a soft glow.
3. Install motion-sensor lights near cooking stations for practicality.
4. Choose lighting that fits your overall aesthetic.
FAQs:
– Can I use indoor lights outside? No, indoor lights are not weatherproof and can be unsafe.
– How do I ensure safety? Use outdoor-rated lighting fixtures for durability.
10. Modular Furniture for Flexibility

In small spaces, flexibility is crucial! Modular furniture can help you easily rearrange your outdoor kitchen for cooking or dining, depending on what you need. Look for lightweight, movable pieces that serve multiple purposes.
Ingredients:
– Stackable chairs or stools
– Foldable table
– Benches with storage (optional)
Instructions:
1. Choose stacking chairs or stools for easy storage.
2. Use a foldable table for versatility in dining space.
3. Incorporate benches with built-in storage for added functionality.
4. Ensure all pieces are weather-resistant to last outdoors.
FAQs:
– Can I use any furniture? Yes, just ensure they’re lightweight and suited for outdoor use.
– Is it easy to set up? Yes, modular furniture is designed for quick assembly and disassembly.
11. Herb and Spice Corner
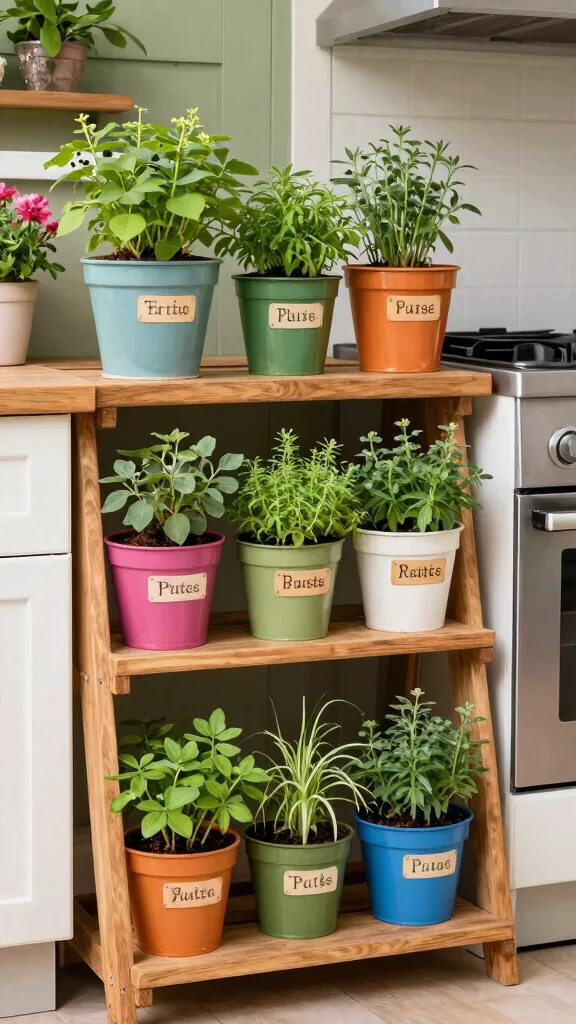
Do you want fresh herbs at your fingertips while cooking? Creating a dedicated herb and spice corner adds beauty and functionality to your outdoor kitchen. Having herbs nearby elevates your cooking experience with fresh flavors.
Ingredients:
– Small pots or hanging planters
– Easy-to-grow herbs (basil, cilantro, parsley)
– Labels for the pots (optional)
Instructions:
1. Use small pots or wall-mounted containers to save space.
2. Choose herbs that grow well in your climate.
3. Arrange pots near your cooking area for easy access.
4. Label each pot for a charming touch.
FAQs:
– Can I grow herbs indoors? Yes, many herbs can thrive indoors with proper light.
– How do I care for them? Regular watering and sunlight will keep them healthy.
12. Creative Use of Colors
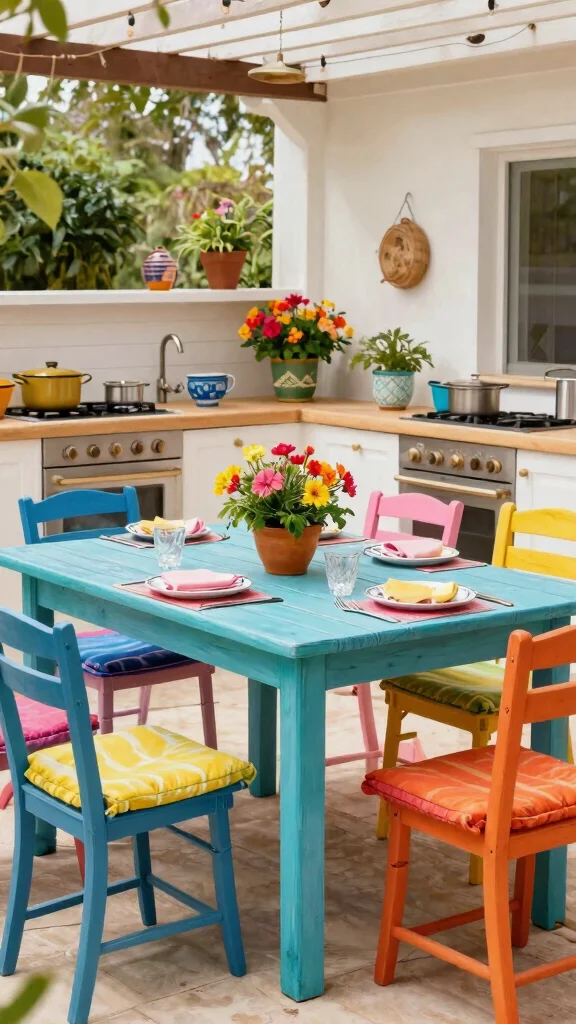
Want to make your outdoor kitchen feel more inviting? The right colors can significantly influence the ambiance of your space. Choosing a vibrant color palette can create a lively atmosphere that reflects your personality.
Ingredients:
– Paint for furniture or cabinetry
– Colorful cushions and decor
– Colorful pots or flowers
Instructions:
1. Refresh furniture or cabinetry with bold paint colors.
2. Accessorize with bright cushions and tableware for a cohesive look.
3. Mix and match colors for an eclectic feel or keep it monochromatic for elegance.
4. Use colorful pots and flowers to add life to the space.
FAQs:
– Can I change colors frequently? Yes, feel free to refresh your colors as seasons change.
– How do I choose colors? Select shades that resonate with your style and existing decor.
❝ Fun fact: a bold color palette can make an outdoor kitchen on a budget feel 20–30% larger. Pair bright cushions with painted cabinetry to refresh the space in a weekend. Pro tip: swap in colorful pots and flowers for an instant mood lift.
Conclusion
Designing an outdoor kitchen on a budget doesn’t mean sacrificing style or functionality.
With these innovative ideas, you can create a beautiful space that fits your unique style while keeping costs low. From repurposed materials to creative layouts, each concept is a testament to how DIY spirit can transform your backyard into a culinary paradise.
Feel inspired to take on your outdoor kitchen project? Get started today!
Note: We aim to provide accurate product links, but some may occasionally expire or become unavailable. If this happens, please search directly on Amazon for the product or a suitable alternative.
This post contains Amazon affiliate links, meaning we may earn a small commission if you purchase through our links, at no extra cost to you.
Frequently Asked Questions
What are the essential budget-friendly elements for an outdoor kitchen on a budget?
Begin with a compact, functional layout and choose pieces that serve multiple purposes. A simple grill cart paired with a small prep station can create a cohesive look without breaking the bank. Use affordable materials like weather-resistant plywood with outdoor-grade paint or natural cedar accents to keep the vibe high-end. Plan around one statement feature—such as a built-in grill, a stone veneer panel, or a bold backsplash—and build the rest with modular pieces you can upgrade later. By prioritizing function and cohesion, you can achieve outdoor kitchen on a budget without sacrificing style.
Tip: stick to a limited color palette to enhance budget garden aesthetics and make inexpensive patio designs look intentional.
How can I maximize a small space with DIY outdoor kitchen ideas without sacrificing style?
For a small space, use DIY outdoor kitchen ideas that are compact and modular. Mount a grill on the wall, add a slim prep ledge, and use a weatherproof cabinet for storage. Go vertical with rail planters or a wall-mounted pot rack to free ground space. Choose one or two countertop materials to keep it cohesive and aim for a stylish backyard kitchens look on a budget. Finish with warm lighting and inexpensive patio designs like string lights or solar lanterns to pull the look together while maintaining budget garden aesthetics.
Which affordable materials and finishes give a high-end feel for an outdoor kitchen on a budget?
Look for durability and visual continuity. Stainless-steel appliance carts, concrete or quartz-look countertops, and stone veneer or porcelain tile backsplashes can read as high-end without the cost. Use a consistent color story—soft neutrals with a bold accent help achieve stylish backyard kitchens. Weatherproof cabinetry, outdoor-rated paint, and a simple lighting plan can elevate the space. Consider repurposing items like a garden bench as seating to save money. This approach helps deliver a true outdoor kitchen on a budget with budget garden aesthetics.
What maintenance tips help extend the life of an inexpensive patio design and outdoor kitchen?
Seal stone and concrete countertops annually, cover grills when not in use, and keep drainage clear to prevent water damage. Use weatherproof covers for cabinets and store cushions indoors during rain. Clean and reseal wood elements seasonally to prevent warping. With a little routine care, your outdoor kitchen on a budget will stay looking fresh and functional, preserving affordable outdoor cooking quality over time.
Bonus: check fasteners and hinges for rust-prone areas and re-seal paint to keep surfaces vibrant.
How can I blend budget garden aesthetics with stylish backyard kitchens and create a welcoming space?
Start with a cohesive palette and a few high-impact accents. Choose budget-friendly materials that mimic luxury—like stone-look tile, a timber-framed pergola, or a simple outdoor rug. Add planters, herbs, and vertical greenery to soften edges and tie the space to the garden. Install warm lighting, such as string lights or lanterns, and use multi-season cushions to keep comfort high. With DIY outdoor kitchen ideas you can achieve stylish backyard kitchens that don’t break the bank, delivering budget garden aesthetics and affordable outdoor cooking for year-round entertaining.
Related Topics
outdoor kitchen
budget friendly
DIY outdoor cooking
stylish backyard
inexpensive patio
small space cooking
affordable design
garden aesthetics
easy renovations
modern outdoor spaces
backyard upgrades
summer cooking